A blog about stuff you can do when you get bored, or just stuff to do in general, most things are relatively cheap and inexpensive, something alternative to do.
OK so I guess you could say I was real bored on this one and it started off as a joke, but turned out to be a good hour and a half of good fun and laughter and a bit of blast from the past memories.
By the way, this isn't really for anyone still in there teens, well mainly anyone under 18 or still in high school else it won't be as fun cause your still in your teenage phase.
Number of people: 2+ you definitely can't do this by yourself and one of these people has to be at least a girl.
Time of day: Day or night
Duration: 30min - 2hours
Budget: $5 - $20
Equipment:
1 Girlfriend magazine (or any other trashy teenage magazine)
a packet or 2 of lollies
some chippies (chips)
I'm do most stuff with food so you may see food in everything I do (food is just a social language) Guidelines: (this is pretty easy but its part of my blogs structure so just read)
OK so this is pretty simple, pretty much you go to your local supermarket or convenient store buy some trashy teen magazine, some lollies and other snacks and then read the magazine.
Its pretty fun and funny cause at some point you were a teen, and reading the magazine will probably bring back memories laughing at our own teenage hood, and how dumb we were in high school. Reading this you realize how much you've changed and how much of an idiot you were, teenage crushes, silly things you did to impress people or fit in, laughing at how super naive you were...And if you really didn't pick any of these up then you can just laugh at the teens these days and think "is this what teens are really getting up to these days?" any ways either way I'm sure you'll have a good time reading the magazine.
This is something I do a bit, and something I really enjoy, its something you can do by yourself, with a group of friends or with that special someone. I'd definitely recommend this to those who like to talk or if you like quiet time.
Number of people: 1+, this is nice for some alone time or to hang out with your friends/family.
Time of day: Evening twilight till early morning
Duration: 30min - 3hours+
budget $0 - $20
Equipment (recommended but not needed)
Candle in a glass jar (as the wind will blow out a normal candle) or lantern
Blankets and mats (can get cold, not really needed in the summer)
Insect repellent (if your the type that gets bitten buy mossy like me)
Food/snacks (always goes with talking, hot foods or deserts are the best nuggets, chips etc)
MP3 player (if your having some alone time)
Wine, beer (a few quiet drinks)
Guidelines
Get your supply, food candles, insect repents etc. Food wise I'd recommend
Hot food
nuggets
hot chips
dumplings
Cold food
ice cream cones (pick some up from the petrol station the the way if you are driving)
cakes
apple pie
finger fruit (cherry's, grapes, strawberry's)
A lot this stuff you can pick up at a late night fish 'n' chips shop or fast food outlet
Some wine and beers also goes well or just some juice, remember to drink responsibly if you are driving (and also if your not).
Find a nice spot under the stars where no one else is (or not many), recommended places includes
beach
wharf/jetty
mountain top (easy access one, maybe one that over looks the city)
parks
playgrounds
backyard
roof top
farm
Light the candle(s)/lantern set some mood lighting
Hangout, talk, eat think what ever you like
Remember to take any rubbish if you have any.
Hope you have some nice alone time or some nice socializing with your friends/family :D
So as again, nothing much to hanging out on a friends wharf and saw some ducks come along so we fed them, was some good fun.
Number of people: 1 - 8+, no real rule to how many people can feed ducks, but I'd recommend maybe under 8 as too many people can take some of the fun away.
Time of day: Day time activity or afternoon activity
Duration: 30min - 2 hours, just depends on how much bread you have and how many people.
Budget: $0 - $10
Equipment
Bread,
Bread,
and more Bread
Directions(its not rocket sciences how to feed ducks but here some help)
Go to your local convenient store and buy some bread (we used 4 loafs for 5 people), you might think its alot of bread but its pretty fun and after the first loaf you'll want more.
Find a place with ducks, the less people the better, we had a private wharf/jetty that our friend have at the back of their house.
Feed the ducks, hang out with friends, talk, laugh while your at it and then feed some more.
Try ripping them up into lots of small pieces and making it rain bread, its pretty fun.
Well that should last you a good 30mins - 2hours depending on how much bread you have, its a good way to hang out with your friends/family talk and have some nice peaceful time.
OK, so I had nothing much to do last night so I got together with a buncha friends to make waffles. They turned out amazing, and super delicious. Hope you enjoy.
Number of people: 1+
Duration: 1.5-3hours
Budget: $0 - $20 depending on what you already have at home
Recipe I found at allrecipes.com after looking at a few others this one had the best review rating of 4.5/5, and man were they amazing I'd give this recipe 5/5. Best Waffles I'd ever had and even better cause we did it ourselves. They are deliciously fluffly and crispy on the outside. This recipe is a bit more complicated than most, so remember to follow the recipe closely and make sure your yeast isn't past the used by date (cause ours was and it didn't work so we had to buy some more yeast). If your good at baking then this should be simple for you.
Other notes before you start
-This recipe makes enough to feed about 6 about 2 big waffles each.
-Do a few test on different temperatures we used a mid-high setting on our waffle iron, the hottest setting seemed to cook the outside too fast leaving the inside slightly under cook.
-We used a Breville waffle iron (looks like this),
Ingredients
7 g active dry yeast
60 ml warm milk (110 degrees F/45 degrees C)
3 egg yolks
650 ml warm milk (110 degrees F/45 degrees C)
170 g butter, melted and cooled to lukewarm
100 g white sugar (100 g is the standard amount form the recipe, we liked it a tad sweeter so we put another 2 table spoons in (about another 50g)
9 g salt
10 ml vanilla extract
500 g all-purpose flour
3 egg whites
Directions
In a small bowl, dissolve yeast in 1/4 cup warm milk. Let stand until creamy, about 10 minutes.
In a large bowl, whisk together the egg yolks, 1/4 cup of the warm milk and the melted butter. Stir in the yeast mixture, sugar, salt and vanilla. Stir in the remaining 2 1/2 cups milk alternately with the flour, ending with the flour. Beat the egg whites until they form soft peaks; fold into the batter. Cover the bowl tightly with plastic wrap. Let rise in a warm place until doubled in volume, about 1 hour.
Preheat the waffle iron. Brush with oil and spoon about 1/2 cup (or as recommended by manufacturer) onto center of iron. Close the lid and bake until it stops steaming and the waffle is golden brown. Serve immediately or keep warm in 200 degree oven.
Serve with your favorite toppings, ice cream, berries, cream, sauces, syrups.
Its pretty plain and simple, I started writing this blog when I was bored, and I also started a personal blog about my thoughts and life (when I was bored), I don't even know if anyone reads them but hey its pretty fun when your actually writing them, you get the feeling of sharing/talking to people. Number of people: 1+
Duration: 5min - 1hr, you can post short posts or long ones, just depends on your style whats your blog about
Budge: Free (providing you have a computer and internet at home that is)
Equiptment
A computer
Internet access
Guidelines
-Pick a topic to write about, this can be anything, there are blogs about anything and everything, i saw someone a blog a bout cats that look like hitter. -This can be can be done just by yourself or you could get together with some friends and together keep it up to date. -A successful blog needs to be have regular posts (so I've been told), maybe once or twice a week, but depends on what your blog is about. If its about news/current events then its appropriate to post every day. -Tell people about it, post it on your facebook/myspace/twitter page so people can see you have a blog, who knows maybe you could get famous from it (if you want to that is). -Make it look pretty (I know his blog isn't that pretty but I will work on it).
Visiting the museum may not be for everyone but if you like it then this is just a reminder that its there. I love the museum, its cheap its fun and there's always interesting things to see and it gets allot more fun after you leave school.
Number of people: 1+, this is something that's OK to do by yourself, and maybe kill some time.
Time of day: Day time activity, sometimes night time, when they have special events.
Duration: 30min-3hrs, you can have a quick troll round or a slow one, depending on the size of the museum also.
Budget: $0 - $40, some museums cost money, some are free some have donations, usually no more than $15, sometimes there are special events that may cost more.
Nothing much to it, easy and fun trip, if you want opening hours, costs, and locations you can pretty much find all this on the internet, and you can always call up if not.
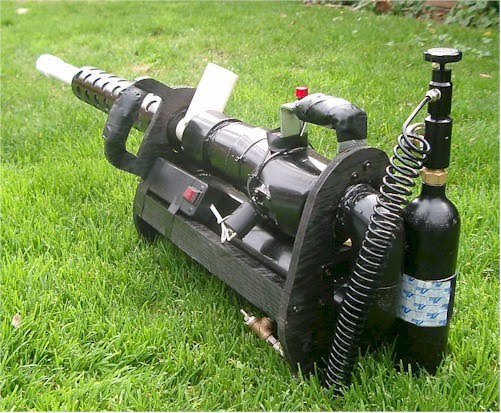
Making a spud gun is an awesome experience, its one of things you feel a real accomplishment doing. Its fun and its powerful and you get some good times just shooting potato out into no where. They can go from 50-200 meters and break bones, just don't be too silly and you'll be fine. Some countries spud guns are classed as firearms so to own one you need to have a fire arms licenses or equivalent (pretty much rights to own firearms).
(funny picture I found on Google thought I'd put it up cause I'm to lazy to take my own)
Number of people: 1+, I'd recommend more, that way you can split the costs, or just get some help of a friend and plus its not that fun going around by yourself.
Time of day: Day time activity, though you can make/use it at night time too, it does make a little bit of noise.
Duration: 1-3hrs building, 30min - 3hours using, something you can take camping, fishing etc.
Budget: $40 - $120, depends on what you already have, or what you can get off your friends
Equipment
A BBQ piezo (figure A)
A 3" PVC door/lid junction this has to be a seal tight lid (figure B & C)
A 3" joiner (figure D)
30-35cm of 3" diameter PVC pipe (figure E)
A 3" to 1.5" or 2" reducer junction depending on what you chose figure G (figure F)
80~100cm of 1.5" or 2" diameter PVC pipe (figure G)
if you feel the need, get a tape measure and a pencil too.
You can get most of these supplies at your local hardware shop, you can get the piezo at a BBQ shop, and potato obviously at the supermarket. Make sure your fittings all fit before you buy them! and make sure your piping is PVC pressure rated piping (something like schedule 40 or 80, 3" pipe rated at schedule 40 can handle about 150 PSI, and at 80 can handle about 220psi, smaller the pipes the higher pressure they can handle).
Instructions
Cut all your piping to size, no need for exact measurements, the combustion chamber (3" pipe) should be roughly 1/3 the length of the barrel (the 1.5" or 2" pip)
Drill a hole roughly in the center of the 3" pipe this hole should be the size of your piezo in diameter, so when you put your piezo in it should fit comfortably.
Apply the epoxy glue around the hole, then put the piezo into the hole making sure you don't get any glue on the tip else it won't spark, apply glue around the piezo to ensure a good seal. check to make sure the piezo is still working before continuing with the next steps. Some piezo's have threads, in that case apply some glue and screw it in, always good to add extra glue in after.
Roughen up the joining bits with the filer (only where they will be joined), this helps ensure a solid join.
5. Apply the PVC glue and join it together, you only want to apply the glue only right before you put them together, so do them one at a time. (follow the image in which way to join them). Make sure you don't get glue on your lid/door, else it'll become a big hassle to get off.
Allow a good 24hrs to settle (or what ever it says on your glue), most of it will have dried up after about 2hrs but to get the glue fully settled in and for your spud gun to be most robust you should let the glue fully settle in.
When your spud gun has been all set in file the end of the barrel to make it sharp (this helps with cutting the potato's)
Now your ready to go, find a big open field, or next to the beach lake etc. force the potato into the barrel, and push it close to the end of the barrel, make sure you don't push too far else its a big mission getting the potato out of the combustion chamber.
Open the lid/door, spray a little bit of flammable liquid and quickly shut the lid/ door. Don't spray too much as you'll flood the combustion chamber, remember you need oxygen to burn your fuel. You'll get use how much you need. If it doesn't fire the first time try a few more times, if it still doesn't fire, you need to air it out and start again with the fuel.
This is just the basic spud gun, you can make them a little bit more complicated, like adding a handle with a 'T' junction to making real complicated with like double combustion chambers, do some Googling and you'll sure see some crazy ones.
(a crazy spud gun i found on Google)
Remember spud guns are classed as firearms in some countries, they can seriously hurt people, so be ware of where you aim it. I'd recommend not to take in to anywhere with too many people, when people see it they tend to come up to you and start asking questions.
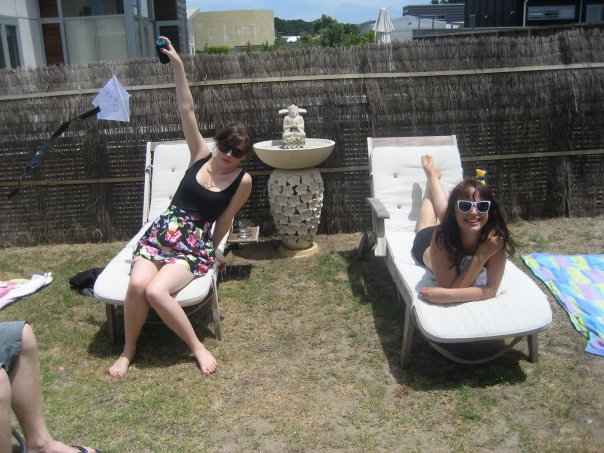
Kite flying is something I've done when I'm bored and it's really fun once you get your kite in the air, I once flew a kite that took a whole 5kM roll of cotton string off, had to get binoculars to see my kite, and the good thing is once you've had enough fun you can just let the kite go if its too far gone since its only made with cheap materials.
On holiday during new years flying kites (I stole your photo Nichole cause I don't have one)
Number of people: 1+ , I'd recommend doing this at least one other person as doing anything alone is usually boring, but if your the type that likes to have some alone time then doing this by yourself is fine too.
Time of day: Day time activity, with light to moderate winds.
Duration: 30min - 2hrs+
Budget: $0 - $10
Equipment
A4 or A3 paper
kebab sticks
A rubbish bag
Sellotape
Scissors (that can cut plastic bags and kebab sticks)
Cotton roll or any sort of light string at least 30 meters long
Instructions
Take a piece of paper and fold it in half.
Fold the top layer towards the right so that the crease mark is at an angle. Exact dimensions are not important, try to leave one inch at the top and two inches at the bottom, and do some trial and error for best angles.
You will get the basic kite shape.
Place a long strip of tape and tape down the middle of the kite. This connects the two front flaps.
Cut the kebab stick to length and place a across the top of the kite and tape it down corner to corner. If your making a A3 size kite you may need to join 2 kebab sticks together with sellotape to reach across the kite.
6. Turn the kite over and punch a hole (pointy side of the kebab stick works well) in the middle flap about 1/3 of the way down and about 1 or 2cm in so the paper won't rip easily. Make sure you don't disfigure the paper too much during this process . Then tie the string through the hole.
Fold the middle flap towards the right. Wiggle it back and forth a little until it stands upright
Turn the kite over and attach streamers (1 to 3) with sellotape at the bottom of the kite. If you have 3 you want them about 8mm (roughly) wide if you have 1 you want it about 15mm (roughly) wide. A tail that is 5 to 6 feet long flys very well. A tail that's 3 feet also works well, the tail is for balancing the kite to help prevent spinning.
You can decorate them if you want with felts coloured pencils etc (usually girls want to), sometimes they break quiet fast and turns out a waste of time decorating them.
Now your ready to take it out side, start running against the wind, with a short bit of string and slowly let more out, once you've got it in the air maintain a bit of tension to keep the kite sitting right in the air, if the kite is pulling let more string out.
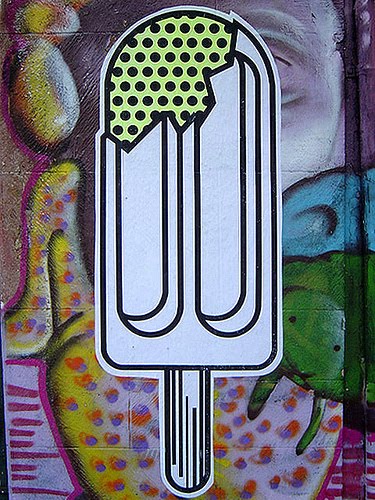
Wheat pasting is a form of street art, you make paste from wheat and you stick pictures up around the place. This is possibly illegal in your country. And yes it is the paste you used in kindergarten and yes that's how out door posters are stuck up.
Number of people: 2 - 3 people best but I would recommend no more than 5, as it gets obvious when you have 5 people pasting things up.
Time of day: night time activity
Duration: 1 - 2hrs+
Budget: $5 -$20 starting
Equipment: (all rough estimates)
~3/4 cup of wheat flower - though rice flower works too
~6 - 7 cups of water
~1 teaspoon of Sugar
A house pain brush or paint roller - a half size paint roller works best from my experience
Printed pictures you want to put up - they should be printed by a laser printer
A Small bucket - make sure your roller can fit inside if your using a paint roller
An Open hand bag - the cotton ones that shops gives out are best or the cotton reusable grocery bags
A Bag for your designs - we use a paper bag
Steps
1. Make your design, draw it on computer or by hand. (a black and white/grey scale picture will be cheapest)
2. Print your design out with a laser printer (a photo copiers is a laser printer) if you print it on a inkjet printer(most home printers) the ink will run, if you drew it by hand you can photo copy/scan it, if you don't have a laser printer (most people don't) you can take your design/poster/picture to a printing shop or photo copying machine, usually about 20c per A4 page and colour copies will cost more. Note, half a A4 page is about best size for your design for ease of finding places to put them, but making big ones are also fun, and you only need about 10 - 40 copies a night before your legs get tired.
3. Cut around your design so there's a small white boarder around it, it just looks better after you put it up.
4. Put the flower into a medium-large size bowl, add about 1 and a 1/2 cup of cold water and start string till there's no more lumpy bits (or close enough). If you use boiling water to open it it'll cook the wheat and makes it go lumpy as.
5. Pour the mixture into a pot with a little bit of boiling water, add the sugar and slowly add boiling water while cooking and string the mixture. Don't add too much water it shouldn't be runny (better to be too thick than too runny). Just experiment with water to Wheat ratio as I've never noted it down. The first time you do this you should test it on something at home before you go out. (this video might help)
6. Once your mixture is ready pour it into your bucket and your ready to go.
7. Find a flat wooden, brick, metal, plastic etc surface that you want to put your wheat paste on, paint/roll the paste onto the surface, slap the design on then paint/roll the paste over it again this water proofs it. The paste needs to cover the whole design to water proof the whole thing. This should be done when no one or not many people are watching/around.
Please be curtest and not wheat paste on people properties as that's just sad. Stick to street signs, lamp post, transformers etc usually where other wheat paste have already been done, another word government property. If you see places where there have been wheat paste pealed off or painted over then they clean that area regularly and its a bit of a waste of your time pasting it there as it'll get taken down or painted over straight away. An untouched wheat paste can last a few years. Try making different designs, different sizes to change things up a bit, write a message if you feel the need to educate the world. The CBD's the best place to wheat paste.
Remember this is illegal in most countries, look out for cops, security guards, street cleaners and CCTV cameras!
I decided to write a blog about stuff to do when you get bored or just stuff to do in general, cause I'll probably get bored and look on my blog when I forget what cool stuff you can do and hopefully you will too.
Blog will have tags like budget, possibly illegal, etc.


 Take a piece of paper and fold it in half.