 (funny picture I found on Google thought I'd put it up cause I'm to lazy to take my own)
Number of people: 1+, I'd recommend more, that way you can split the costs, or just get some help of a friend and plus its not that fun going around by yourself.
Time of day: Day time activity, though you can make/use it at night time too, it does make a little bit of noise.
Duration: 1-3hrs building, 30min - 3hours using, something you can take camping, fishing etc.
Budget: $40 - $120, depends on what you already have, or what you can get off your friends
Equipment

if you feel the need, get a tape measure and a pencil too.
You can get most of these supplies at your local hardware shop, you can get the piezo at a BBQ shop, and potato obviously at the supermarket. Make sure your fittings all fit before you buy them! and make sure your piping is PVC pressure rated piping (something like schedule 40 or 80, 3" pipe rated at schedule 40 can handle about 150 PSI, and at 80 can handle about 220psi, smaller the pipes the higher pressure they can handle).
Instructions
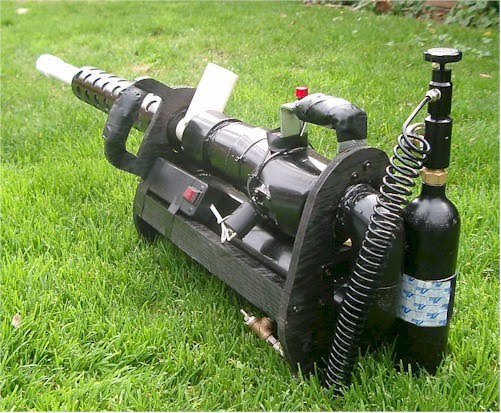
This is just the basic spud gun, you can make them a little bit more complicated, like adding a handle with a 'T' junction to making real complicated with like double combustion chambers, do some Googling and you'll sure see some crazy ones.
 (a crazy spud gun i found on Google)
Remember spud guns are classed as firearms in some countries, they can seriously hurt people, so be ware of where you aim it. I'd recommend not to take in to anywhere with too many people, when people see it they tend to come up to you and start asking questions.
Time of day: Day time activity, though you can make/use it at night time too, it does make a little bit of noise.
Duration: 1-3hrs building, 30min - 3hours using, something you can take camping, fishing etc.
Budget: $40 - $120, depends on what you already have, or what you can get off your friends
Equipment

- A BBQ piezo (figure A)
- A 3" PVC door/lid junction this has to be a seal tight lid (figure B & C)
- A 3" joiner (figure D)
- 30-35cm of 3" diameter PVC pipe (figure E)
- A 3" to 1.5" or 2" reducer junction depending on what you chose figure G (figure F)
- 80~100cm of 1.5" or 2" diameter PVC pipe (figure G)
- PVC glue and Epoxy glue (figure H)
- Bag of Big potatos (figure I)
- Flammable spray liquid (hair spray, air freshener, butane, etc) (figure J)
- A drill (figure K)
- A hacksaw (figure L)
- A file (figure M)
if you feel the need, get a tape measure and a pencil too.
You can get most of these supplies at your local hardware shop, you can get the piezo at a BBQ shop, and potato obviously at the supermarket. Make sure your fittings all fit before you buy them! and make sure your piping is PVC pressure rated piping (something like schedule 40 or 80, 3" pipe rated at schedule 40 can handle about 150 PSI, and at 80 can handle about 220psi, smaller the pipes the higher pressure they can handle).
Instructions
- Cut all your piping to size, no need for exact measurements, the combustion chamber (3" pipe) should be roughly 1/3 the length of the barrel (the 1.5" or 2" pip)
- Drill a hole roughly in the center of the 3" pipe this hole should be the size of your piezo in diameter, so when you put your piezo in it should fit comfortably.
- Apply the epoxy glue around the hole, then put the piezo into the hole making sure you don't get any glue on the tip else it won't spark, apply glue around the piezo to ensure a good seal. check to make sure the piezo is still working before continuing with the next steps. Some piezo's have threads, in that case apply some glue and screw it in, always good to add extra glue in after.
- Roughen up the joining bits with the filer (only where they will be joined), this helps ensure a solid join.
- 5. Apply the PVC glue and join it together, you only want to apply the glue only right before you put them together, so do them one at a time. (follow the image in which way to join them). Make sure you don't get glue on your lid/door, else it'll become a big hassle to get off.
- Allow a good 24hrs to settle (or what ever it says on your glue), most of it will have dried up after about 2hrs but to get the glue fully settled in and for your spud gun to be most robust you should let the glue fully settle in.
- When your spud gun has been all set in file the end of the barrel to make it sharp (this helps with cutting the potato's)
- Now your ready to go, find a big open field, or next to the beach lake etc. force the potato into the barrel, and push it close to the end of the barrel, make sure you don't push too far else its a big mission getting the potato out of the combustion chamber.
- Open the lid/door, spray a little bit of flammable liquid and quickly shut the lid/ door. Don't spray too much as you'll flood the combustion chamber, remember you need oxygen to burn your fuel. You'll get use how much you need. If it doesn't fire the first time try a few more times, if it still doesn't fire, you need to air it out and start again with the fuel.
This is just the basic spud gun, you can make them a little bit more complicated, like adding a handle with a 'T' junction to making real complicated with like double combustion chambers, do some Googling and you'll sure see some crazy ones.
 (a crazy spud gun i found on Google)
Remember spud guns are classed as firearms in some countries, they can seriously hurt people, so be ware of where you aim it. I'd recommend not to take in to anywhere with too many people, when people see it they tend to come up to you and start asking questions.
 Take a piece of paper and fold it in half.